Youtube https://www.youtube.com/channel/UC84lipWz8oYs3pCUpfK3w8A/videos

Thursday, July 30, 2015

Cinderella goes Cowgirl! Altered Shoe Blog Hop


The first bloghop from the first ever ColourArte Design Team!!!!!  You won't want to miss a thing! 


Read the fairytale below

and

don't miss the video !!! (link here and below)


Once Upon A Time. . .       

Cinderella longed to go to the Prince's Rodeo, but her boots were a disaster!   This was a job for her Fairy Paintmother . . . . (who just happened to have a magical brush and a fresh stock of  ColourArte Silks Acrylic Glazes!) 


 The Fairy Paintmother waved her magic  brush over the boots and said the magic  words: "Perfect Paints!"  

   and PRESTO! 

     SHIMMERING BOOTS!     

Cinderella galloped away on her mare and found her two ugly stepsisters at the rodeo fighting over some silly pair of glass slippers. The Prince was bucked off the bull, but recovered just in time to return the boot that Cinderella lost during her Barrel Racing Event.  He proclaimed that from that day forward Cinderella would be his Rodeo Queen!  The Fairy Paintmother rode her paint pony into the shimmery sunset!           

And they all lived happily ever after! 

Be sure to leave a comment on this blog so I can enter you in the ColourArte giveaway!  A prize on every blog on the hop!  Prize:   Each blog on the bloghop will choose one winner who will receive a $25 gift certificate to shop at ColourArte!  To win you MUST comment on this blog and on the ColourArte blog at ColourArte.com/blog.  You have until Aug. 6 to do this, but there is no time like now!!!  I will announce my winner on this blog on Aug. 7.


Oh, Baby!!! Let's all do the HOP!  

(The Altered Shoe HOP!)  

 Click here: An InLinkz Link-up for other ColourArte Designers in this hop!


Announcing . . .

Announcing...

I was charter member of ColourArte's very first design team . . . but my term  expires at the end of August.  Am I sad?  

Not at all! Now there is not only a ColourArte Design Team but also a brand spanking new 

ColourArte Video Creator Design Team !!! 


And now I am a charter member of that team!!!  


I'm so excited to be part of this new team!  I am as happy as a monkey with a new banana!!!
 
Click here to see all the members of ColourArte Design Team and ColourArt Video Creator Design Team!!!!

Saturday, July 25, 2015

Sunday, July 12, 2015

Dollar Store Find...A ColourArte Project

IPAD COVER73

I used Primary Elements Artist Pigments, Primary Elements Clear Gloss Medium, and Radiant Gels Dimensional Paint from ColourArte products to paint feathers on electronic device covers, officially called "Tablet Sleeves."  


IPAD COVER61

Click here for the YouTube Tutorial Video

 The covers are foam lined and I purchased them for $1.00 each at my local dollar store. Obviously they are intended for an Ipad or other tablet, but can be used for much more.  


Think: Photos, sketchpads, pencils, watercolors, books, travel receipts, etc.

Please follow my blog for more art news!

First Friday at AH HA featured Native American Artists

I love the rusty metal AH HA building

The last stop on my July, 2015, First Friday Art Crawl in Tulsa was at AH HA.  So glad I made it to this one!  All Native American works and what a treat it was!!!  I apologize for not recording the names of all of these works.  I was so engrossed in the work that I simply forgot!  I was deeply moved by both artists but managed to photograph more of Sense's compositions than of Goshorn's baskets.  Again, I was touched by the works and did not document properly.  I recommend that you go to Goshorn's website listed below to see more of her fabulous baskets.  It is worth your time!   About INTERTWINED

Weaving relies on the careful cultivation and planning for a project that will transcend the limitations of the original material, bound in measured and intertwined parts, to have the potential to hold great burdens within its supportive walls. This is the nature of Intertwined, Stories of Splintered Pasts. Shan Goshorn and Sarah Sense have brought together their shared love of weaving to address the complex political and social history of Native American experiences through artistic examination.

Artist Statements & Perspectives

“The traditional shapes patterns and functions of Cherokee baskets inspire my work, but I am weaving with the contemporary medium of Arches Watercolor paper.  Paper (and the written word) has been used as a weapon against Native Americans in the form of treaties, ancestry rolls, laws, restrictions, and more.  By creating baskets out of paper printed with a variety of these documents and photographs, my work offers an opportunity to re-examine history from another point of view.”
– Shan Goshorn
Eastern Band Cherokee
“Like photographs, stories are a recorded history, merging time and memory repeatedly both orally and visually.  These works in INTERTWINED, Stories of Splintered Pasts focuses on history of family and the placement of self in a community and also as an outsider.  An architect once told me, ‘always be an outsider.’  I think that this was his way of understanding international socio-political circumstance when creating community dwellings.  I understand it now as a way to think differently, to understand something that may not be within reach emotionally.”
-Sarah Sense
Choctaw / Chitimacha


Wall Hanging by Sarah Sense


Choctaw Irish Relationship 1
Bamboo paper, rice paper, collograph print, inkjet print,
wax and tape
by
Sarah Sense

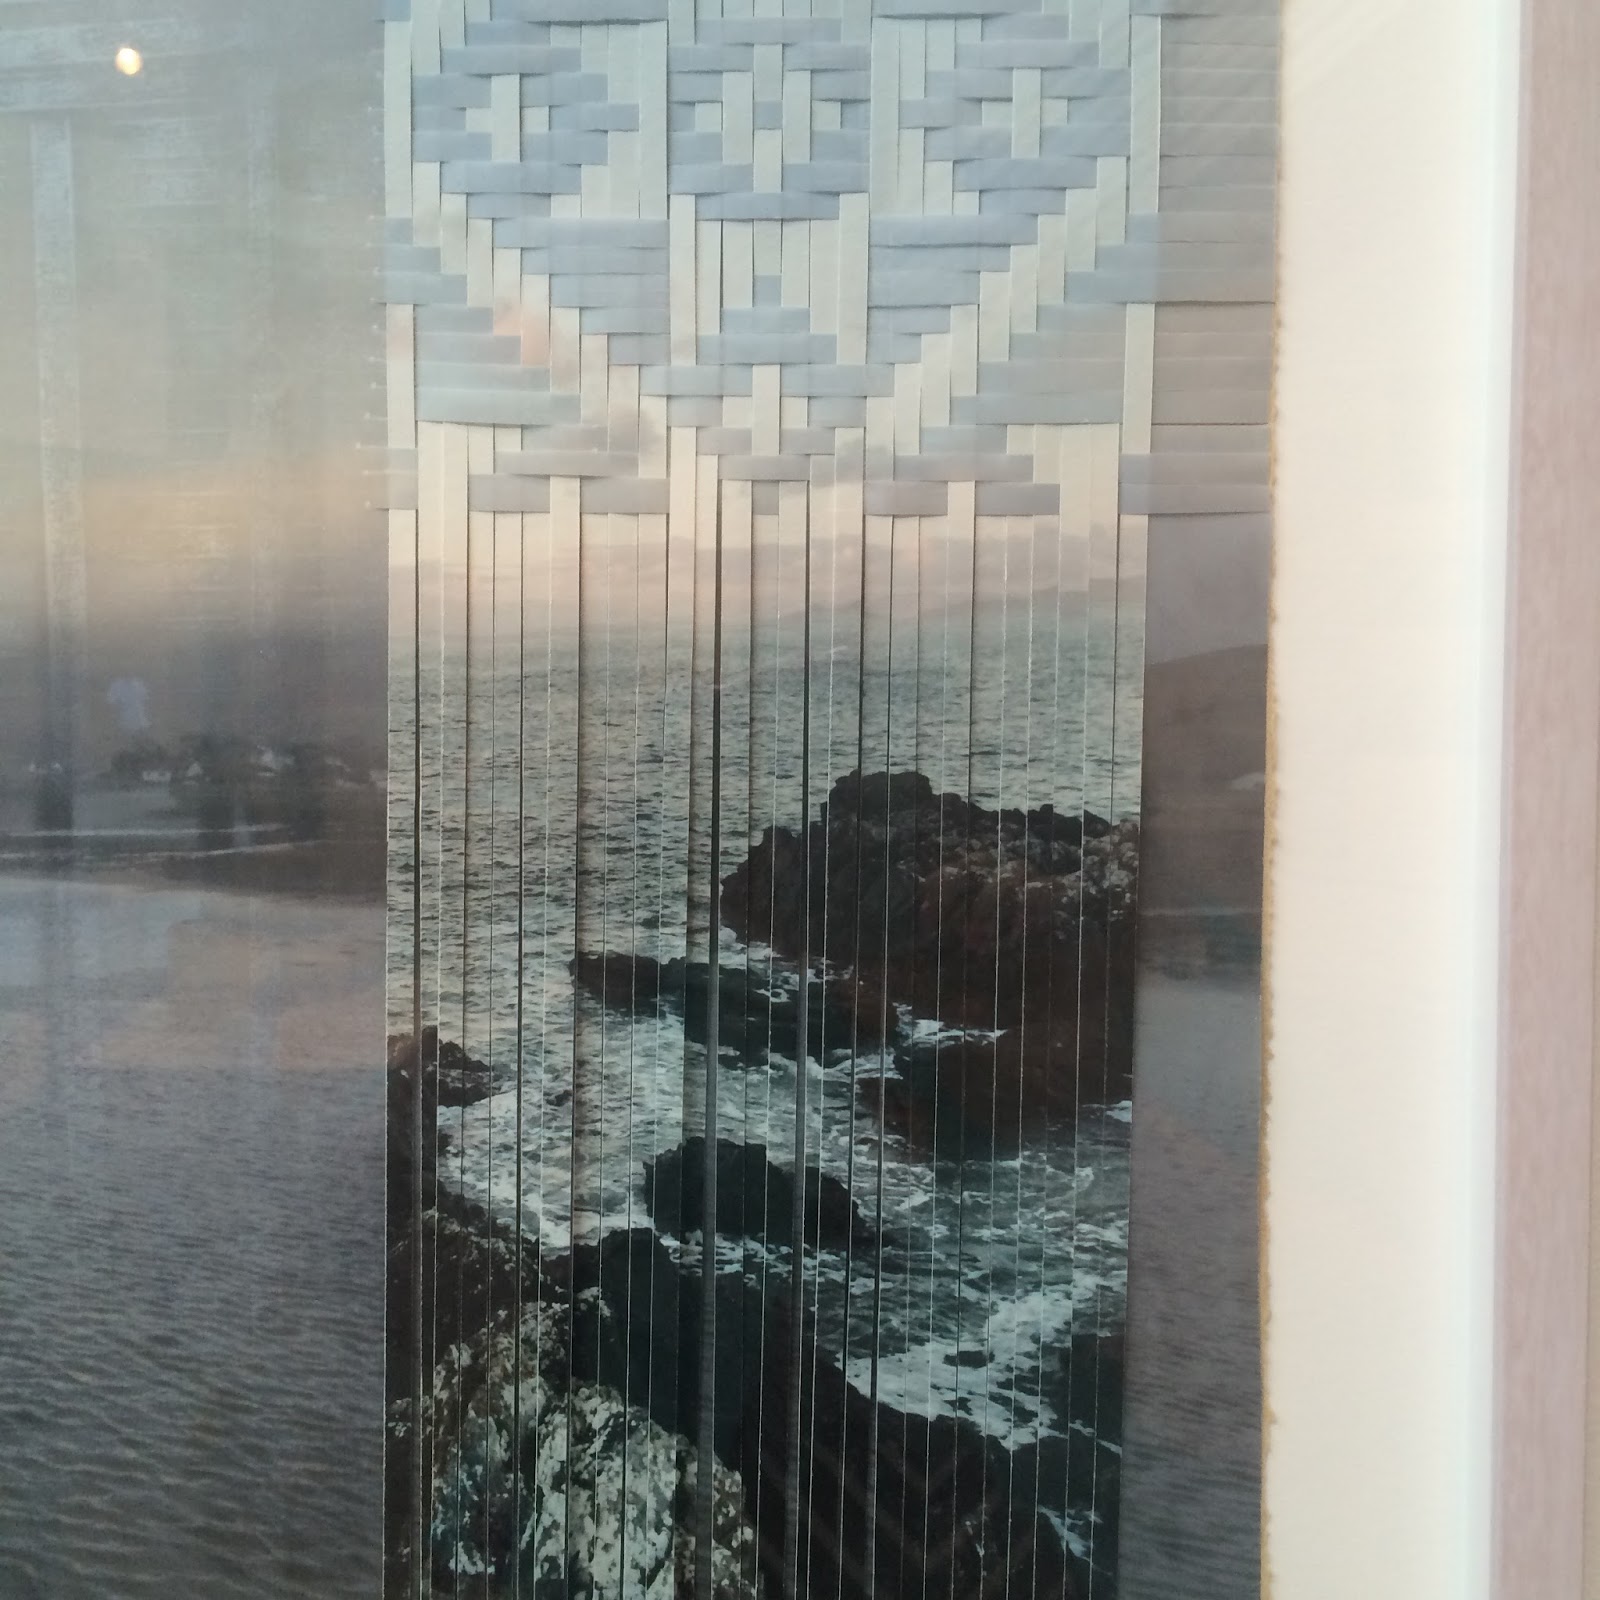
Detail of Choctaw Irish Relationship 1(above)


Color of Conflicting Values
Arches watercolor paper printed with archival inks, acrylic paint, gold foil
by
Shan Goshorm


Framed weavings  of Choctaw Irish Relationship
 Bamboo paper, rice paper, pen and ink, acrylic paint, inkjet pring, wax and tape
 by Sarah Sense
.  


Detail


Art by Sarah Sense

Detail of work above

Her Story, our Legacy
Bamboo paper, rice paper, pen and ink, inkjet prints,
tape, and wax
by Sarah Sense


Detail of Her Story, Our Legacy

Detail of Her Story, Our Legacy


On the second floor at AH HA, Native American Art continued with live painting demos, completed within two hours!
The artists were  Brent Greenwood, Micah Wesley, and Matthew Bearden


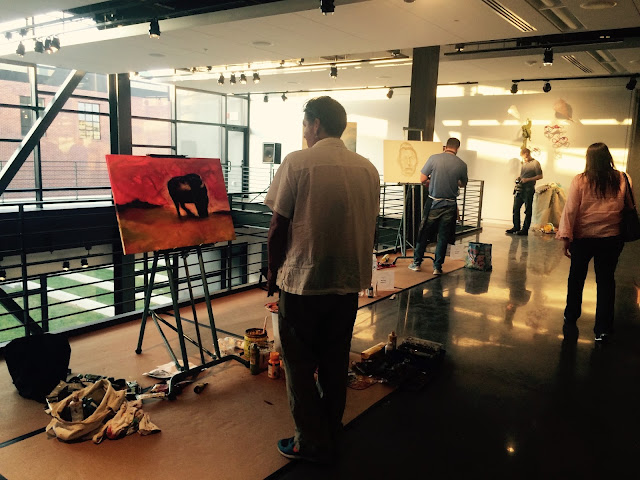
Brent Greenwood, Micah Wesley, and Matthew Bearden painting compositions within a two hour limit


Brent Greenwood turns his painting upside down to work on the canvas


Brent Greenwood's Work in Progress

Brent Greenwood adding the final touches

Micah Wesley painting his composition

View of Micah Wesley's work in progress
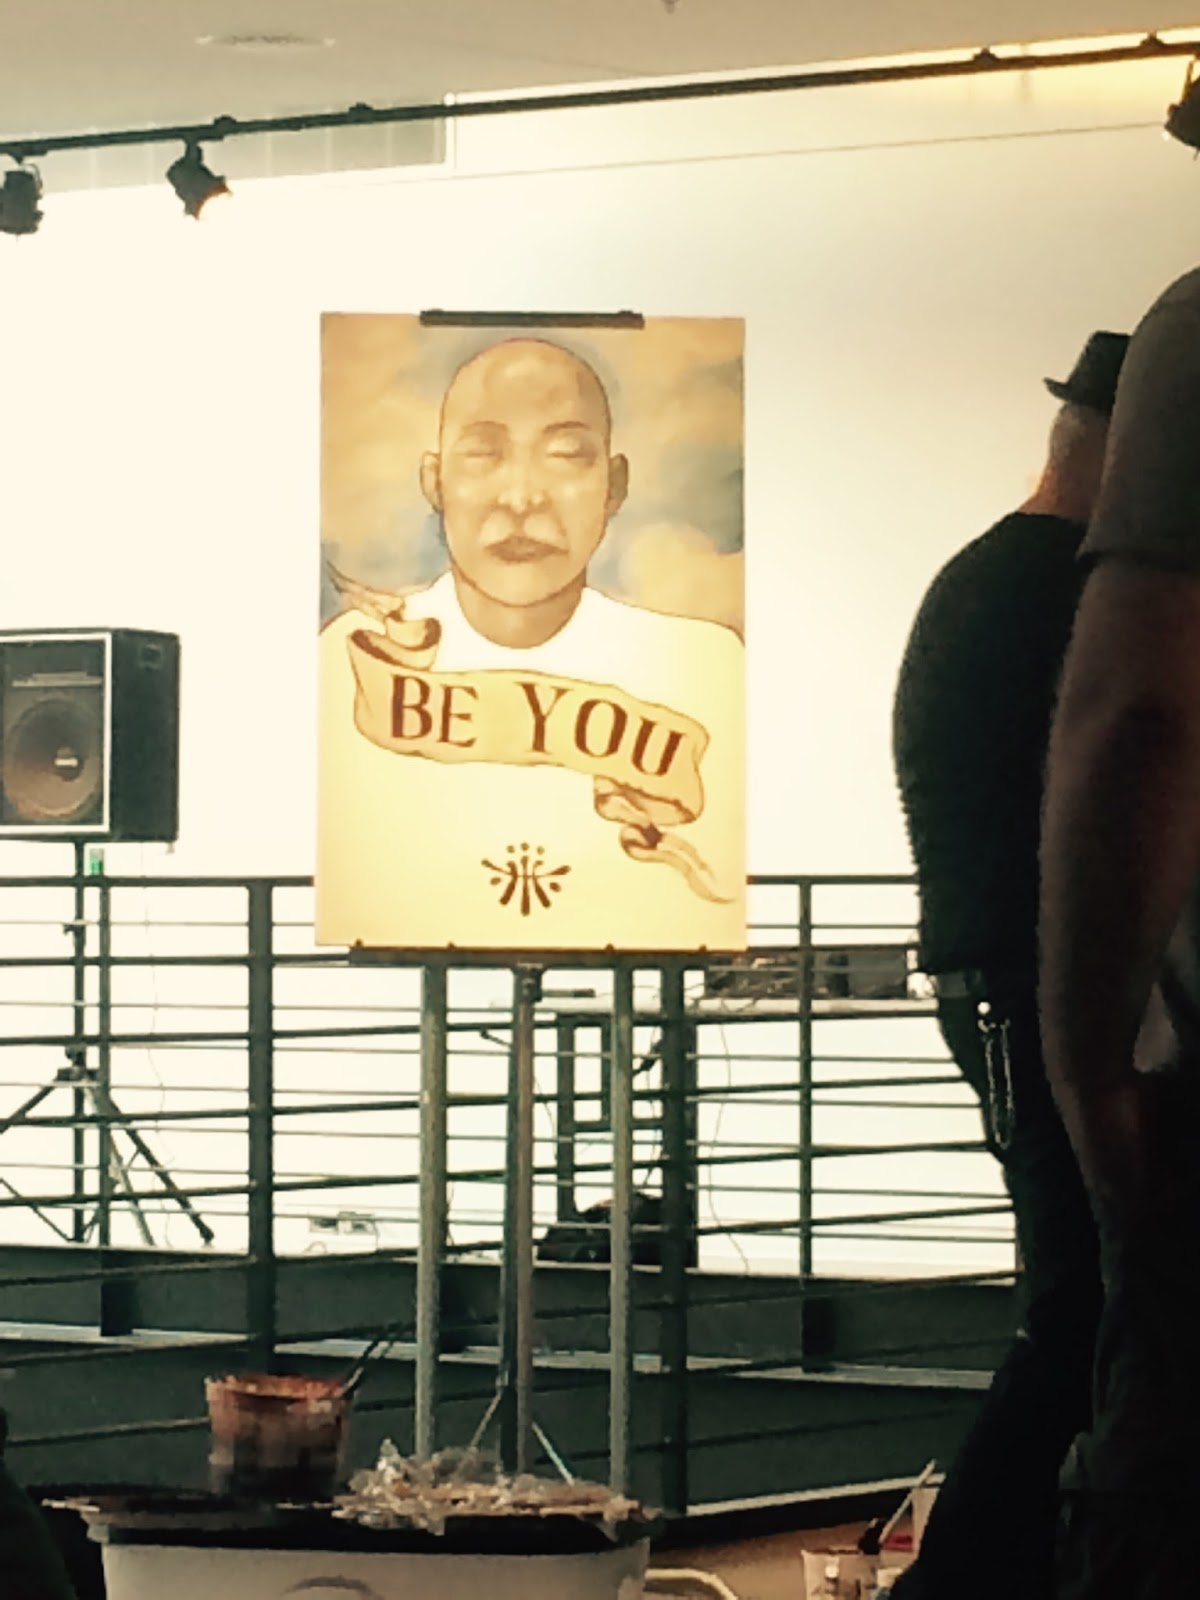


Be You
Completed painting
by Micah Wesley


Micah Wesley clearing his supplies after the demo
Matthew Bearden paints the face of a Native American

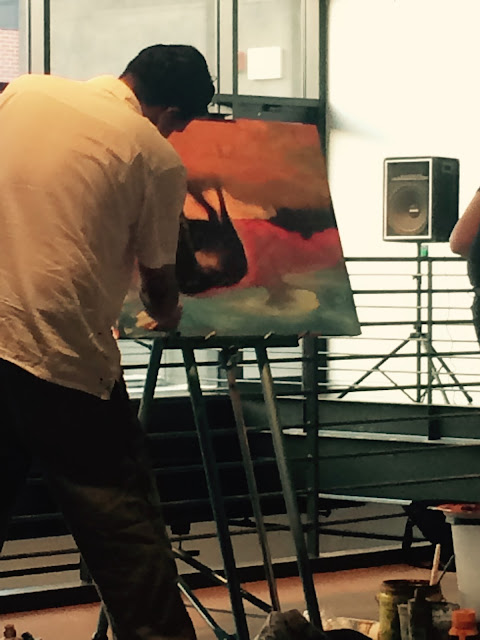
Matthew Bearden's painting


*****
That's it for this post, but I cannot wait to see what is in store for First Friday in August!!

Friday, July 10, 2015

Featured at Tulsa, Ok First Friday Art Crawl- Lindsay Ketterer Gates


The work of Lindsay Ketterer Gates, was also featured at this month's First Friday Art Crawl in Tulsa, OK.   She is from Milford, PA and focuses on transforming mundane materials into extraordinary works of art, combining textile and fashion design techniques.  She combines industrial materials with tedious, but graceful wire-looping.


Year of the Snake
Stainless mesh, paint, coated opper wire
16" x 15" x 7"


I did not catch the name of this one, but it was a lovely composition.


Detail of work above


Calendula
Stainless mesh, paint, coated coppe wire, steel, patina
29" x 13" x 5"


Celestial Navigation
Stainless mesh, paint, coated copper wire, steel, patina
24" X 12" X 6"


Kylix in Blue
Stainles mesh, paint, coated copper wire
19" x 11.5" x 6"

Detail of Kylix in Blue


Tangled
Stainless and copper mesh, paint, coated copper wire, steel patina
18" x 24" x 15"


Metamorphosis
Wire, aluminum rings, steel, patina, paint, stainless screening

********


Hear Lindsay Ketterer Gates' NPR interview at Studio Tulsa
NPR Studio Tulsa: Rich Fisher interviews Lindsay Ketterer Gates


You can find her website at:

Lindsay Ketter Gates' website

Sunday, July 5, 2015

ColourArte Picture Frame and Color Experiment


Picture Frame made with ColourArte products from an Old Battered Canvas


To view the video above on how to make the ColourArte Picture Frame click on the arrow above.


Materials: 
A tired or discarded canvas
 Radiant Gels Dimensional Paints 
Primary Elements Artist Pigments (mix with Primary Elements Clear Glaze Medium)
Aleene's Original Tacky Glue (or other strong glue)

Directions: 

Ever have days when all your art turns into a disaster?  The day I created this canvas must have been one of those days. 
"Monster" canvas

 I found the monster above hiding in my closet when I was cleaning my studio, and I guess it was just so scary that it blocked my memory, because I don't recall making it.   Since I try to use everything without creating an abundance of trash, it is time to upcycle! 

 So . . . what is your first thought about reclaiming a canvas?  

If you are like me, you will normally grab sandpaper, smooth the surface, and gesso over the canvas to provide a new fresh start.  

But "what if?". . . and so the journey begins . . .  

Think of all the things you would normally do to with a bad canvas and then stretch your brain to try something new!

Flip the canvas to the back and paint white gesso on all the surfaces, across canvas, staples, and wood.

(I had no idea at this point what I planned to do with it, but I had taken my first step on the journey, and that is so important!  If you don't know where to start, just leap out there and begin!)


When the gesso dries, paint the entire front and sides with flat black acrylic paint. 

(I painted this under mainly because I wanted to destroy the "monster" . . . but a new idea began to develop while I was painting!  Since  ColourArte is always the Perfect Paint for any yummy, shimmery surface, I wanted to compare how Radiant Gels Dimensional Paints and Primary Elements Artist Pigments (mixed with Primary Elements Clear Glaze Medium) change colors on different background colors.)
These are all painted with Radiant Gels Dimensional Paint from ColourArte.com
Begin painting areas of the white side and the black side with the same colors and compare the results.

 Paint until all areas of the canvas are filled on both sides.  

Fill both sides of the canvas with these colors:  Stargazer, Coral Berry, Spiced Pumpkin, Emperor's Gold, Olive Vine, Guatemalan Green, Autumn Leaf, and Key Lime.  


Continue painting until both sides of the canvas are filled with color.  Compare the differences of painting on a white surface (above) with those colors painted on a black surface (right).


Flip canvas back and forth to compare the differences of painting over white vs. black as a background.
When you are  satisfied with the first color comparisons add more layers, painting one color over another to see how the layers build new colors.


Try mixing Primary Elements Artist Pigments with Primary Element Clear Glaze Mediums and paint over colors on the canvas with those mixtures.

Then try another experiment:
Paint over the colors on the white side with mostly cool colors.


Paint over the colors on the "black" side with mostly warm colors.

 (Warm colors are those that make you think of fire and sunshine: Yellows, Reds, Oranges and Cool colors are those that make you think of water, grass, and mountains:  Blues, Greens, and Violets.)

  I loved the abstract compositions on both sides, but decided it would be nice to see the colors side by side, so out came the scissors. 
Push the sharp end of a pair of nail scissors through the canvas near its center and began slicing triangular shapes from the center outward toward the edges of the wood frame on the canvas.
Punch a hole near the center with sharp scissors.  Don't let this scare you!!! It's fun!!!!


Cut triangle shapes fom center of canvas to wooden support at the outside edge.
Cut radiating lines from center of canvas to the wood on all four edges.

Bring the triangles through the middle and twist, curl, fold to form patterns on the back side of canvas.  When satisfied with the design, glue to the wooden frame.


 Turn frame vertical or horizontal to meet your needs.


And now you have a gorgeous shimmering frame for a photo or your next ColourArte project!


Can't wait to get started on mine!


Don't forget to visit ColourArte.com/blog  There is a new free art tutorial there each day planned just for you by an international design team.