Youtube https://www.youtube.com/channel/UC84lipWz8oYs3pCUpfK3w8A/videos

Sunday, January 18, 2015

Second Love

My dear friend, Candy Schuringa and her husband, own a lovely antique shop in Dewey, Oklahoma, called Second Love.  I visited her shop this week and found  gorgeous well-displayed high-end antiques.  Everything was beautiful, and I was thrilled to find the most gorgeous art dolls!  She has other Pepper Hume dolls in the shop, but I fell in love with this one!


\
Isn't she beautiful?


I did a little online research and found a photo of Pepper Hume with this doll.  You can see it  here
http://www.dollworx.com/

Monday, January 5, 2015

Legend of the Dragonfly


1.  Begin with a blank canvas.  Cut a circle from freezer paper and place it off center shiny side down, on the canvas, and tape it to the back edge of the canvas.  Also tape a couple of places on the front of the canvas. (This is just to hold it in place temporarily. Tape can be removed in the area you want to stamp and then reattached for the next process.)


2.  Choose a rubber stamp that will look attractive when stamped multiple times around the circle.   I chose a simple dragonfly stamp, but any stamp you like will work.  Use the paper circle as a guide and stamp all the way around the outside of the circle creating a frame with permanent black ink . 


I like all embellishments to wrap around the sides of the canvas to give the it a finished look without framing,  

3. Use a permanent marker to enhance or darken any of the stamps that did not turn out dark enough.  You will need to see this design through tissue paper.


4.  Leave the freezer paper circle attached shiny side down  on the canvas with the tape and choose a semi-transparent color of tissue paper.  I chose lime green.  Tear all the finished edges off of the tissue paper and begin attaching it to the canvas overlapping and covering the stamped area. Use a brush and Mod Podge or 1 part white glue and 1 part water mixture.  The tissue paper will slightly overlap the edge of the paper circle.  Once you start gluing the tissue paper down the circle will remain in place and you can remove all tape on the front of the canvas.


5. When you have covered the entire stamped "frame" begin adding darker shades of tissue paper.  I chose a color scheme of bright green and violet.  Continue to overlap your original color into this area also. The more you overlap, the darker the colors.  Use a heat gun if you wish to speed the drying process.  Be certain the glue is completely dry before moving on to step 6.


6.  Now it's time to remove the freezer paper.  Slide a sharp pointed knife under the paper circle.  Hold it flat against the canvas and cut the circle away from the tissue paper.  


Use a utility knife or scissors to trim any loose edges from the edge of the canvas.


7.  Choose an acrylic paint color that looks good with your composition. I chose turquoise because I like all of the cool colors together (greens, violets, and blues) , and because I never think a painting is finished unless it has a little turquoise!!!...my favorite color.   :-)     I placed a smaller circle inside the blank circular area and painted out away from the circle to leave a white center.  

\

We learn as we go and the smaller circle really wouldn't have been necessary, since I later changed what I had planned to do.  Changing my mind midstream happens often in my art.  I just like to le! it flow!


 I could have just freehand painted a wide band inside the blank circle, but it gave me a nice guide for the next printing process. 


IMPORTANT:Be sure your paint is thoroughly dry before proceeding to the next step!

g


8. Choose a second stamp for the inside "frame." I searched through my stamps for something geometric, but I couldn't find anything, so I chose the Eiffel Tower stamp, and used it like a geometric element.  I simply reinserted the smaller paper circle in the middle to mask the top half of the tower, so I would only see the arch . Note the red markers on the stamp to make placement easier.  I used a cactus green permanent ink for the arches.


I used permanent markers to enhance some of the geometry of the lower half of the tower and added some permanent marker "beads" between each arch.


9.  At this point, choose rubber stamps to embellish the canvas outside the frame as you see fit.  I chose a permanent black ink and stamped a feather three on the lower left of the canvas.


10.  Now it is time to finish the middle.  Choose a photo, picture, painting, or quote and glue it to the center of the circles.  Be sure to smoothe out all the bubbles.  I thumbed through an old sketchbook and was delighted to find a drawing I had finished of a dragonfly.  It was a perfect solution since my outer frame was also dragonflies!!!!  I used a rusty hinge color of distress ink on the edges and  Mod Podge to attach the drawing.


DONE!!!!


Monday, December 29, 2014

The RUSTY TRIO OF 2014

One of my passions in art is to incorporate found objects. I confess that my affection for rust has found a huge space in my very overcrowded studio, but a select few have morphed into art works...


BUFFALO ROAMED


Ironically, this car hood  found on Rt. 66 is the ONLY found object that I have claimed and knew from the moment I saw it what I planned to do with it.  My immediate response to this hood cast aside on the road was how carelessly that people discard such items on our beautiful countryside. This is my statement that we should not find such debris, and that we would be better served to find our Oklahoma wildlife along these roadsides.

Here it is on my dinig table, where I spent five hours cleaning it.  


And here it is a few weeks later propped against the back of my pickup, ready to go to a Native American art show.


BEDTIME STORY


I found this child-sized bed headboard in a countryside creek bed.  A bed in a bed? Why do people dump their garbage in creeks...that has never made sense to me!


Here it is finished with a snarling, salivating wolf.  A twofold purpose:  My wolf is angry about the litter and this is a reminder to be careful of the stories we tell our children when we tuck them into bed.  (Big bad wolf....now go to sleep, Junior.)


HORSE POWER


Perhaps some heavy roadway equipment ran over this item???  I found  this flattened rusty bucket on Highway 20  near Claremore, OK, the home of a very famous Oklahoman, Will Rogers.   It was clearly labeled "Butt Can" in white letters on both sides.  Such irony!...that this item was used to keep people from littering their cigarette butts, but later it became litter itself.  I'm sure if we could consult Will that he would have a humorous line about that!

I pondered and debateded about the rough surfaces on this found object and how I could incorporate them with wildlife...I thought about painting a spider its web,  a turtle, an eagle...


  Nothing seemed right until one of my fellow artists mentioned that this reminded him of an old feed bucket.  Frrom that moment on I couldn't see anything on this rusty can except a horse.  The rounded bottom of the can made a nice Native American shield which I painted with colors of  the Keetoowah Cherokee flag and embellished it with beadwork, jute, leather and feathers.  Feathers on the sheild came from an exotic animal rescue reserve.  My cousin provided the horsehair  from her three beautiful animals.  Thanks, Donna!


ZALLER ART SOCIETY


The three works above are currently displayed with ZALLER ART SOCIETY's fine art exhibit at the Student Union Gallery,  Tulsa Connunity College Southeast Campus,  through Jan.29, 2015, along with some of my other Native American influenced artwork.   My fellow artists are very talented...Great show...go see!


Tuesday, October 21, 2014

Bedtime Story

Bedtime Story... 


Found this child's headboard pictured below abandoned in a creek bed.  The creek didn't need the bed, but I did.  My first thoughts were to turn it into a sweet fairytale painting.  But then I found a two fold purpose for a snarling wolf in the back of my mind...first it is about what we say to our children, and then what we are doing to wildlife.


As a parent and teacher I often read an articles about fears of young children.  I also recalled how I  changed the stories I read to my child when he was small to convey less violent versions.  I wasn't about to read to my child that a queen ordered her servant to cut out a young girl's heart and cook it.  

Yes, Grimm's fairy tales were VERY dark and grim.   Is it any wonder our that children want to check under their beds and in the closet for monsters? 

But what other stories did I tell my son before I tucked him into bed? 

" ... The big bad wolf huffed and he puffed and he blew the house down...."

"....Grandmother, what big teeth you have!"

 I really cannot remember.  It has been too long ago, but I hope I encourage a thoughtfulness about what we say to children and a better understanding  of widlife.  Wolves in the wild are undeniably beautiful creatures seeking survival for themselves and their offspring.   We owe our children and our wildlife an appreciation of nature..  And if you should wonder why the wolf is so angry...would  you be angry if people threw their trash in your living space? 


Monday, September 29, 2014

"State of the Arts" at Crystal Bridges

I mentioned earlier that I discovered the greatest museum over in Arkansas...a nice Saturday morning drive from me .  A must see show for all mixed media artists is "State of the Arts."  Last day for this is Jan. 19, 2014.
Here is a taste of the delights at this show.  Of course, pictures never do justice to being there
.


Bonnet made from over 200,000 pearl head straight pins, created by an Arizona artist.


It's hand carved wood....need I say more?  Amazing....


These creations remind me of giant spindles.  Created mostly from medicine bottles, straws, beads, and rope. Just beautiful!


Ever read a paperback romance? How about making art from thousands of them?


Detail of Forever above/>>>>>>>


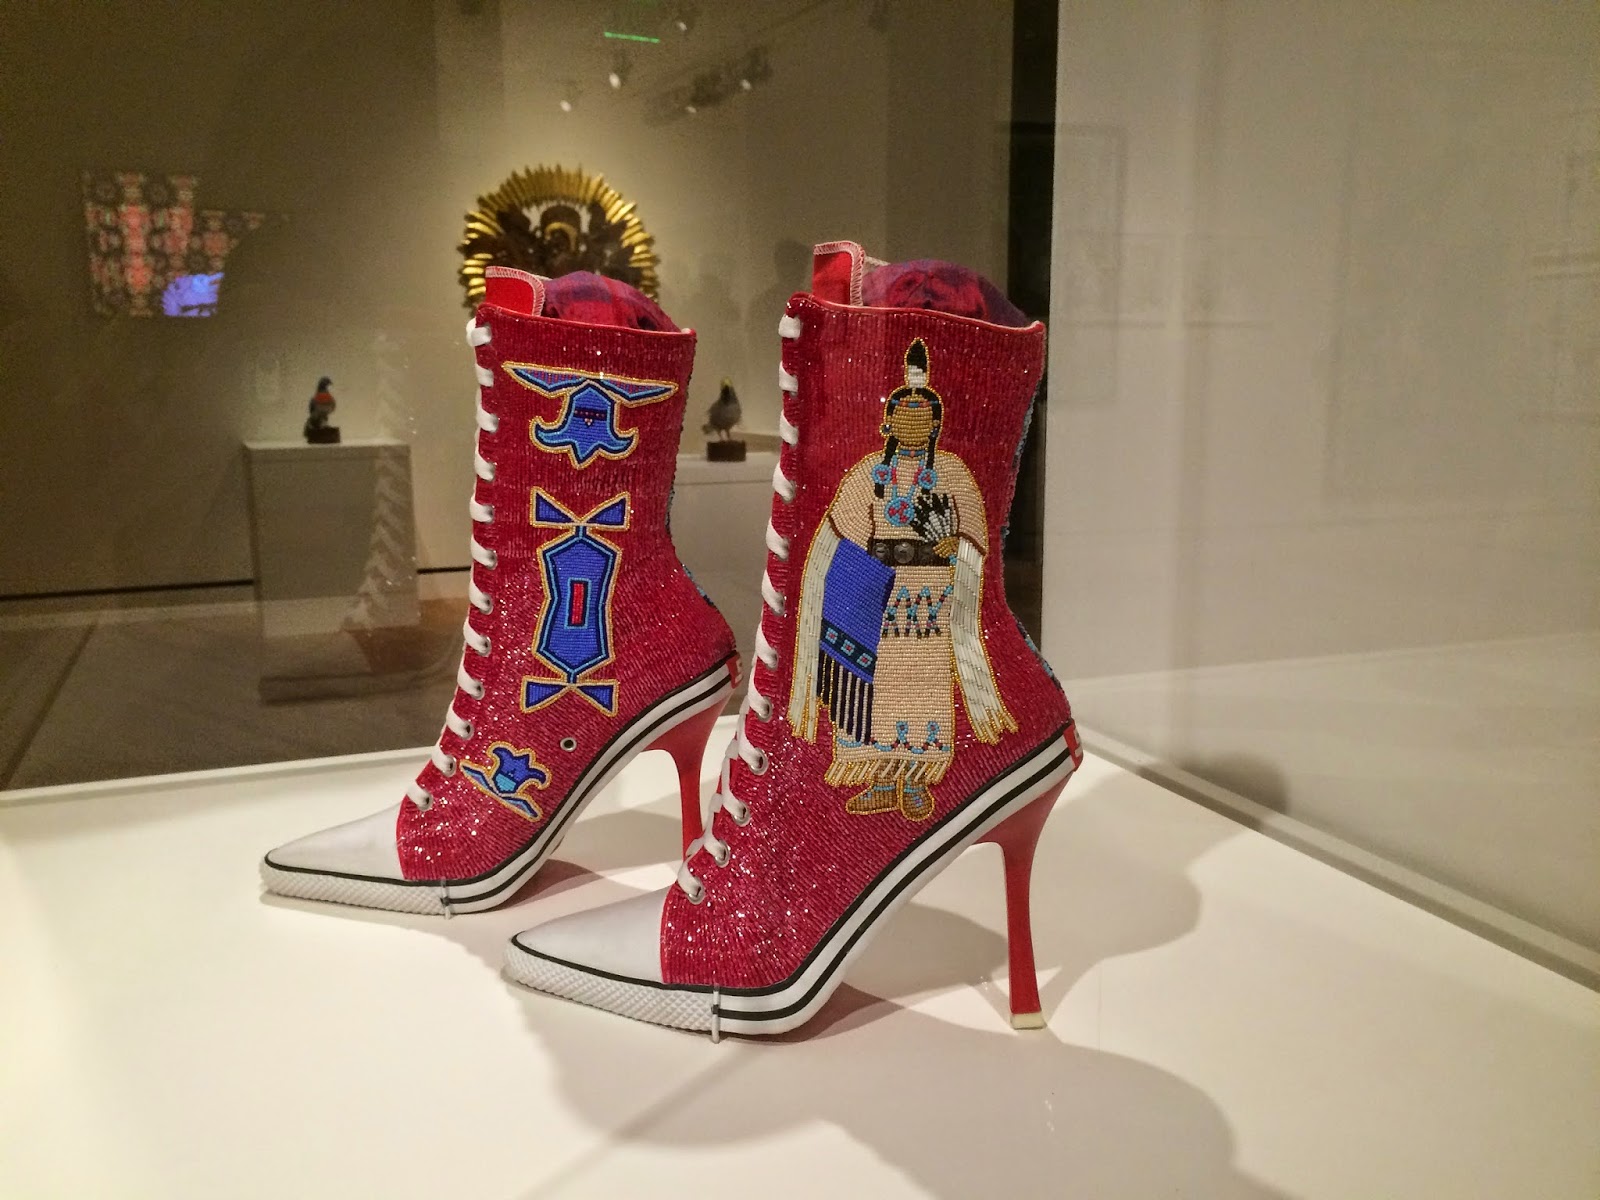
This is NOT your grandma's traditional Native American beadwork....well, it is, but it isn't.


This painting was huge. Just guessing, perhaps 7 feet across?  If not impressed by the size alone, perhaps that it was a study in focus, done a brushstroke at a time. Beautifully rendered....


Monday, September 22, 2014

Crystal Bridges in Bentonville, Arkansas


This  beautiful sculpture greets you at the entrance of Crystal Bridges.  The museum is free of charge, including audio earphones which guide you through the artworks.    Lots of seating throughout both bridges (museum area) so  you can relax as you tour.  I enjoyed the museum store almost as much as the museum.


Georgia O'Keefe?  I was surprised to find that the artist was one I knew well...I wouldn't have guessed that this was her work.


 Rosie was painted by Norman Rockwell.


This is titled "The Lantern Bearers" by Maxwell Parrish


And this beautiful sculpture was one of my favorites at Crystal Bridges....


Summer Art and Activities

Nowata, Oklahoma...Bowling Ball Art


Was not prepared to find this treat when I followed a highway sign to this remote location.  Mr. Barbee has been collecting bowling balls for only eight years, but his art fills a huge space.  It is well worth the drive.  Here are a few of the treasures:

Fence made of bowling balls...


 The pink breast cancer ribbon  and American flag   made from  bowling balls


      Pool table with bowling balls.  In background see the alphabet.


 A building made of bowling balls...Inside are more art pieces made of bowling balls.