Youtube https://www.youtube.com/channel/UC84lipWz8oYs3pCUpfK3w8A/videos

Showing posts with label paint. Show all posts

Thursday, July 30, 2015

Cinderella goes Cowgirl! Altered Shoe Blog Hop


The first bloghop from the first ever ColourArte Design Team!!!!!  You won't want to miss a thing! 


Read the fairytale below

and

don't miss the video !!! (link here and below)


Once Upon A Time. . .       

Cinderella longed to go to the Prince's Rodeo, but her boots were a disaster!   This was a job for her Fairy Paintmother . . . . (who just happened to have a magical brush and a fresh stock of  ColourArte Silks Acrylic Glazes!) 


 The Fairy Paintmother waved her magic  brush over the boots and said the magic  words: "Perfect Paints!"  

   and PRESTO! 

     SHIMMERING BOOTS!     

Cinderella galloped away on her mare and found her two ugly stepsisters at the rodeo fighting over some silly pair of glass slippers. The Prince was bucked off the bull, but recovered just in time to return the boot that Cinderella lost during her Barrel Racing Event.  He proclaimed that from that day forward Cinderella would be his Rodeo Queen!  The Fairy Paintmother rode her paint pony into the shimmery sunset!           

And they all lived happily ever after! 

Be sure to leave a comment on this blog so I can enter you in the ColourArte giveaway!  A prize on every blog on the hop!  Prize:   Each blog on the bloghop will choose one winner who will receive a $25 gift certificate to shop at ColourArte!  To win you MUST comment on this blog and on the ColourArte blog at ColourArte.com/blog.  You have until Aug. 6 to do this, but there is no time like now!!!  I will announce my winner on this blog on Aug. 7.


Oh, Baby!!! Let's all do the HOP!  

(The Altered Shoe HOP!)  

 Click here: An InLinkz Link-up for other ColourArte Designers in this hop!


Saturday, July 25, 2015

YOUTUBE Free Demo Videos

I created this post to list the videos I submitted for the recent artists' collaberation art show on youtube.  Here is the list.  I hope you will watch these and subscribe to my channel!

90th birthday celebration canvas


Paint stained paper towel collage - (part1)


Paint stained towel collage - portrait (part 2)

Sunday, July 5, 2015

ColourArte and Creative Paperclay project: Broken Glass Pendants


To view the free tutorial and video instructions for how to make these pendants, visit ColourArte.com/blog 

 Another upcycle ColourArte project!  Have you ever broken a favorite dish?  Turn those broken treasures into jewelry with Creative Paperclay and ColourArte.


A bit of foil behind the glass gives even more shimmer to these necklaces.
Easy to make and once painted, no one will guess that it is broken glass, paper, and shimmering paints from ColourArte.com!
Also make pendants from small ceramic tiles .... or ....

From the lenses of old suglasses!

Monday, June 29, 2015

Miami Tribe Powwow


I had a great time at the outdoor art show at the Miami Tribe Powwow in Miami, Oklahoma this weekend.  And for those of you who are not from Oklahoma...it is not pronounced like the city in Florida.  Here both the city and the tribe, Miami, is pronounced: my-yam-muh.

 I meant to take pictures but was very busy most of the time and I only managed to get the one above.  I sold this turtle drawing to a happy customer!  


I met folks from several tribes, states, and countries who came to Miami just for this event!  Everyone seemed so happy and it lifted my spirits that were a little low at the beginning of the event!!!

I'm thrilled to report that the children I met at the show were amazing.  They were well-behaved, appreciative of the art, slow to touch, and delightful conversationalists. 

Tabby, who had the sweetest spirit, and Cheyenne, the Miami princess, helped me unload my art from the car. Later Tabby braided my hair and shared some family history...Did you know that in the Miami tribe there are no cousins?  They consider each other sisters.

David was the grandson of one of the vendors,   Sorry to say that I did not make it over to her booth to tell her what a wonderful impression he made.  He was about 13 and shows promise for becoming an artist some day.   This handsome boy was kind, considerate, and smart! He even offered to find supplies for me along the riverbank! 

  One particular six year old,  Joslyn, watched me beading the wire end of my Fancy Feathers.  She was very patient and quiet...and then softly said, "I would like to make one of those."  There was such tenderness in that little voice.  I let her bead one of my paper feather creations, and her great grandmother decided to buy it for her.  It was not my intention to make a sale by showing the child how to place beads on a wire, but that act brought the sale of two more older children in the family who wanted to bead their own paper Fancy Feathers....all sweet beautiful kids.  

And I am not sure, but I think the lady who came up and bought 5 Fancy Feathers from my table was also a relative.  It pays to be nice to children!  

But be nice to them because they are our future, not for a sale!

Wednesday, June 17, 2015

Birdhouse Follow-Up


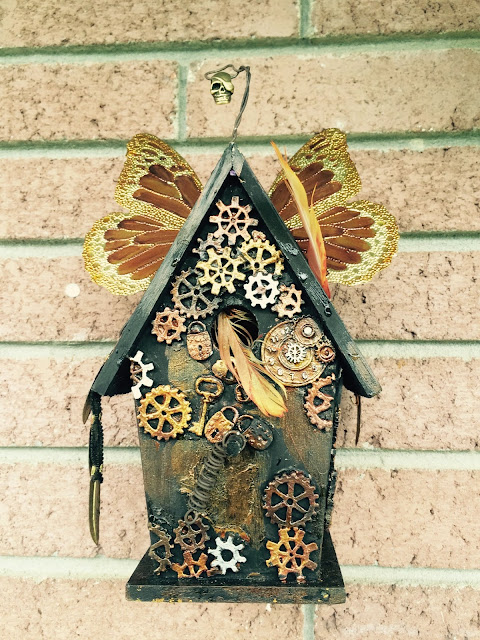
Remember the Steampunk Birdhouse that I made to donate to Habitat for Humanity's Silent Auction?  Just as a reminder, here is my donation:


Time Flies Steampunk by Linda Ann Smitth


The auction was a very successful fundraiser.  I want to share the variety that artists submitted for this worthy cause.  So take a look!


Crocheted Birdhouse by Tonya Smith


Handmade Clay by Misty Hendrix


Longbranch Saloon by Jerry Carlson


Swirls by Tana Washington


Spread Your Wings with Copper Roof by Tonya Smith


Flower Power with button roof by JoAnn DeShong


Climbing Flowers by Paula Hefley


S E Eagle by Kim Foster


Copper Flowers by Josh Bell


Whimsical Cats by JoAnn DeShong


Woodland by Jeff Polaseh


OU by Mary Horsechief


Trailing Flowers by E J Berry


Sequoyah by Mary Horsechief


Wood Nips by Jerry Carlson


Flowery Night Light by Virginia Stroud


Greedy Birds by Cat Lamb


I did not capture the name of this artist but it is a beautiful woodburned  Native American style birdhouse with a hummingbird on front.


Monday, June 1, 2015

NOT your Everyday Birds! :-) A ColourArte Tutorial

It annoys me that people carelessly discard their garbage across our country.  I often reclaim abandoned car hoods, children's rusty bed headboards, old pieces of tires, broken glass, and anything I can remove from the environment that clutters our land to tote home. In my studio I bend, twist, glue, melt,  paint and manipulate the found objects into art pieces.  Studio A B See is always full of objects awaiting their transformation.  

The point is that it is a rare ocassion when  I buy something to alter.  This was an exception.  This book flew off the shelf, grabbed me, and begged me for a  new beginning!  I spent a whole $.25, a quarter of a dollar!, to free it from its dusty home in an antique shop.

Inside the book I found a familiar scene from my childhood . . . an abundance of blank space around text and a seriouos lack of color!

BEFORE

I have altered many pages from the book using ColourArte paints, including Twinkling H20's, Radiant Gels, Radiant Rains, and Silk Acrylic Glazes.  The unending shimmer of these paints is almost impossible to capture on camera, but in real life the pages below almost glow!
AFTER


There are many more BEFORE and AFTER pages of the book in the video below.  I hope you will view it and give it a thumbs up.  I would also like to invite you to subscribe to my youtube channel while  you are there!

BIRDS OF A FEATHER YOUTUBE VIDEO


Visit ColourArte.com each day for new tutorials by other Design Team Members!

Sunday, May 17, 2015

Stretch Paint!; Minimize Inner Critic!

Not sure that I would call this a finished canvas but I enjoyed the journey and will return to it later to decide.  My main focus was to show how to stretch your paint dollar, but as an added reward I found myself quieting my inner critic!
See the video and details on the ColourArte link at the end of this post.


Above:  Real Feathers on Canvas Background

Below:  Canvas after Feathers were Misted with Radiant Gels and Removed.


If you watched my video about Fancy Paper Feathers on Youtube, you know that I misted real feathers with Radiant Gels on top of a canvas.  I rarely rinse a brush without brushing it across a canvas or paper to rid it of most of the paint. It just makes sense! I don't waste the paint.  I simultaneously create new backgrounds that I plan to use at a later date, and that is the case with this canvas that was created when I misted those feathers.   I also save the paper towels where I clean brushes or lift paint.  They make awesome additions for collage work.

See how I created this canvas at ColourArte.com/blog on a project that I titled Stretch Paint!; Minimize Inner Critic


Friday, May 15, 2015

Enchanted


ENCHANTED     Mixed Media on Canvas

A new box of goodies from the magical land of  ColourArte.com   appeared on my porch yesterday.
I think my Fairy Paint Mother delivered it!

 Most of you are probably aware that I am one of the very first members of the ColourArte design team.  (And very proud of that!)  :-)

Yesterday was my first experience with powdered pigments that I mix myself to make my paints.  Once I started, it was so difficult to quit.  You can mix Primary Elements with any water soluable liquid to turn it into a liquid paint form.  I played with water for a bit to make watercolors.

 Just so happens that I had some Mod Podge on my studio desk when these arrived.   So I spent the rest of the day, into the night experiementing with Primary Elements, Mod Podge, and water.  This composition "magically" appeared over an old canvas that I did not like and painted under.  I think I will keep it now!

As I painted I kept thinking, I should take some photos as I go, but I could not break myself from its mystic spell long enough to do so.

Needless to say, Primary Elements will become one of my staples in the studio, and I haven't even touched the surface of what they can do.

Oh my goodness.....I LOVE these pigments...so shimmery, and I can control the intensity!

Tuesday, April 21, 2015

Updating Vintage Children's Books Tutorial

 Here is a vintage book that I used to test Twinkling H2O's 


The page below is printed with only two colors, green plus a black outline.  Typical of the times, there are only three colors (green and turquoise, with black outlines) in the entire book.


 I'm going to jazz it up with a makeover!


Painted the photo and margins with Twinkling H2O's with crisp edges on the bird, but using a wet into wet technique on background

Monday, January 5, 2015

Legend of the Dragonfly


1.  Begin with a blank canvas.  Cut a circle from freezer paper and place it off center shiny side down, on the canvas, and tape it to the back edge of the canvas.  Also tape a couple of places on the front of the canvas. (This is just to hold it in place temporarily. Tape can be removed in the area you want to stamp and then reattached for the next process.)


2.  Choose a rubber stamp that will look attractive when stamped multiple times around the circle.   I chose a simple dragonfly stamp, but any stamp you like will work.  Use the paper circle as a guide and stamp all the way around the outside of the circle creating a frame with permanent black ink . 


I like all embellishments to wrap around the sides of the canvas to give the it a finished look without framing,  

3. Use a permanent marker to enhance or darken any of the stamps that did not turn out dark enough.  You will need to see this design through tissue paper.


4.  Leave the freezer paper circle attached shiny side down  on the canvas with the tape and choose a semi-transparent color of tissue paper.  I chose lime green.  Tear all the finished edges off of the tissue paper and begin attaching it to the canvas overlapping and covering the stamped area. Use a brush and Mod Podge or 1 part white glue and 1 part water mixture.  The tissue paper will slightly overlap the edge of the paper circle.  Once you start gluing the tissue paper down the circle will remain in place and you can remove all tape on the front of the canvas.


5. When you have covered the entire stamped "frame" begin adding darker shades of tissue paper.  I chose a color scheme of bright green and violet.  Continue to overlap your original color into this area also. The more you overlap, the darker the colors.  Use a heat gun if you wish to speed the drying process.  Be certain the glue is completely dry before moving on to step 6.


6.  Now it's time to remove the freezer paper.  Slide a sharp pointed knife under the paper circle.  Hold it flat against the canvas and cut the circle away from the tissue paper.  


Use a utility knife or scissors to trim any loose edges from the edge of the canvas.


7.  Choose an acrylic paint color that looks good with your composition. I chose turquoise because I like all of the cool colors together (greens, violets, and blues) , and because I never think a painting is finished unless it has a little turquoise!!!...my favorite color.   :-)     I placed a smaller circle inside the blank circular area and painted out away from the circle to leave a white center.  

\

We learn as we go and the smaller circle really wouldn't have been necessary, since I later changed what I had planned to do.  Changing my mind midstream happens often in my art.  I just like to le! it flow!


 I could have just freehand painted a wide band inside the blank circle, but it gave me a nice guide for the next printing process. 


IMPORTANT:Be sure your paint is thoroughly dry before proceeding to the next step!

g


8. Choose a second stamp for the inside "frame." I searched through my stamps for something geometric, but I couldn't find anything, so I chose the Eiffel Tower stamp, and used it like a geometric element.  I simply reinserted the smaller paper circle in the middle to mask the top half of the tower, so I would only see the arch . Note the red markers on the stamp to make placement easier.  I used a cactus green permanent ink for the arches.


I used permanent markers to enhance some of the geometry of the lower half of the tower and added some permanent marker "beads" between each arch.


9.  At this point, choose rubber stamps to embellish the canvas outside the frame as you see fit.  I chose a permanent black ink and stamped a feather three on the lower left of the canvas.


10.  Now it is time to finish the middle.  Choose a photo, picture, painting, or quote and glue it to the center of the circles.  Be sure to smoothe out all the bubbles.  I thumbed through an old sketchbook and was delighted to find a drawing I had finished of a dragonfly.  It was a perfect solution since my outer frame was also dragonflies!!!!  I used a rusty hinge color of distress ink on the edges and  Mod Podge to attach the drawing.


DONE!!!!